Sign up for FlowVella
Sign up with FacebookAlready have an account? Sign in now
By registering you are agreeing to our
Terms of Service
Loading Flow

Downloading Image /
Downloading Image /
Downloading Image /
Downloading Image /
Downloading Image /
Downloading Image /
Downloading Image /
Downloading Image /
Downloading Image /
Downloading Image /
Downloading Image /
Downloading Image /
Downloading Image /
Downloading Image /
Downloading Image /
Downloading Image /
Downloading Image /
Downloading Image /
Downloading Image /
Downloading Image /
Downloading Image /

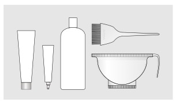
Virgin Lightening & Toning Application
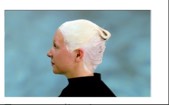
Rinse and shampoo
25. When the desired stage of
lightening has been achieved, rinseand gently shampoo twice. Do not
condition the hair before toning.
Toner application at the
scalp area
26. After shampooing, towel dry
excess moisture from the hair and
leave it slightly damp.

27. Reapply protective cream
along the guest’s hairline.
28. Use a wide tooth comb to divide the damp hair into fourquadrants.
29. Begin in the back right
quadrant and outline it with
formula 2.
30. Take diagonal subsections
from the nape, working up
through the quadrant and applyingformula 2 on both sides of the part at the scalp area.
‼️note: If your guest has porous
ends, apply toner to the scalp
area first. It’s important that
toner application is accom-
plished quickly and evenly over
the whole head. The thickness
of the subsections depends on
the density of the guest’s hair.
Work quickly while ensuring
thorough saturation.
option: If your guest does
not have porous ends, you may
apply toner to the scalp area and
thenimmediately apply it through
the midlengths and ends

31. Move to the back left quadrant and repeat the process.
32. Move to the front right quadrant and outline it with formula 2.
33. Take a vertical subsection from the point of distribution to the right ear. Apply ample product to the scalp area.
34. Continue in this manner,
working toward the front hairline.
35. Repeat this process on the
front left quadrant.
‼️note: A strand test may be
used to determine the process-
ing time of toner.
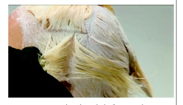
Toner application to
midlengths and ends
36. In the back quadrants, go
through the existing subsections
and apply ample product to the
midlengths and ends. Apply for-
mula 2 to both sides and overlap
the product already applied at the scalp.
37. In the front quadrants, take
vertical subsections and follow theestablished pattern while applying formula 2 to midlengths and ends.
Strand test
38. Perform a strand test to
determine processing time which can range from 1 minute to 30 minutes.
Creativity is more than just being different. Anybody can play weird—that’s easy.
What’s hard is to be as simple as Bach. Making the simple complicated is
commonplace—making the complicated simple, awesomely simple—that’s creativity.—Charles Mingus
Downloading Image /
Downloading Image /
Downloading Image /
Downloading Image /
Downloading Image /
Downloading Image /
Downloading Image /
Downloading Image /
Downloading Image /
Downloading Image /

FlowVella, Previously Known As Flowboard
© 2026 FlowVella
