Sign up for FlowVella
Sign up with FacebookAlready have an account? Sign in now
By registering you are agreeing to our
Terms of Service
Loading Flow

Downloading Image /
Downloading Image /
Downloading Image /
Downloading Image /
Downloading Image /
Downloading Image /
Downloading Image /
Downloading Image /
Downloading Image /
Downloading Image /
Downloading Image /
Downloading Image /
Downloading Image /
Downloading Image /
08. Finger waving
Form the first wave
1. Wet the hair and apply enough setting lotion to be evenly distributed throughout the hair. Pay special attention to the application at the scalp.
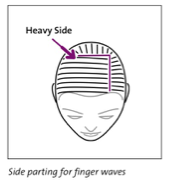
2. Apply a side part. The side with the most hair is calledthe “heavy side.”
3. Distribute the hair evenly through the crown and the entire head. The hair should be positioned as it will be when the hair style is completed.
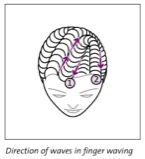
4. Place the middle finger of your subordinate hand on the head above where the ridge is to be formed (#1 in the illustration). If right-handed, use your left middle finger and vice versa.
5. Place large teeth of the comb just below (approximately 1/4” below) the finger (not touching it), where the ridge is to be. Make sure that the teeth of the comb are touching the scalp and the comb is perpendicular to the scalp.
6. Draw the comb approximately 1” toward the hairline (thiswill be the open end of the wave). The comb should remain parallel to the finger and perpendicular to the scalp.
7. Lay the comb down flat against the head.
8. Place your forefinger on top of the comb beneath the ridge to protect the ridge. The ridge is now between your forefinger and middle finger.
9. While still holding the hair in place with your subordinatehand, rotate the comb and comb down through the ends of the hair until all the hair below the ridge is smooth. You can switch to the fine teeth for more control.
Form additional waves
1. To place the second wave, move to the opposite side of the part, the "light side." Begin the second ridge just below the part by moving the hair towards the face, creating the open end (#2 in the illustration on the previous page). Then follow steps 3–9 above to form the wave.
2. Continue the same ridge all the way around the head, until the ridge is complete. When the second wave is complete, the closed end is formed.
3. To form the third wave, start on the side where you completed the previous wave, placing your finger approximately 1/4” below that wave.
4. Repeat the procedure listed above, going in the opposite direction.
Downloading Image /
Downloading Image /
Downloading Image /
Downloading Image /
Downloading Image /
Downloading Image /
Downloading Image /
Downloading Image /
Downloading Image /
Downloading Image /
Downloading Image /
Downloading Image /
Downloading Image /
Downloading Image /
Downloading Image /
Downloading Image /
Downloading Image /
Downloading Image /
Downloading Image /
Downloading Image /
Downloading Image /
Downloading Image /
Downloading Image /
Downloading Image /
Downloading Image /
Downloading Image /
Downloading Image /
Downloading Image /
Downloading Image /
Downloading Image /
Downloading Image /

FlowVella, Previously Known As Flowboard
© 2026 FlowVella
