Sign up for FlowVella
Sign up with FacebookAlready have an account? Sign in now
By registering you are agreeing to our
Terms of Service
Loading Flow

Downloading Image /
Downloading Image /
Downloading Image /
Downloading Image /
Downloading Image /
Downloading Image /
Downloading Image /
Downloading Image /
Downloading Image /
Downloading Image /
Downloading Image /
Downloading Image /
Downloading Image /
Downloading Image /
Downloading Image /
Downloading Image /
Downloading Image /
Downloading Image /
Downloading Image /
Downloading Image /
Downloading Image /
Downloading Image /
Downloading Image /
Downloading Image /
Downloading Image /
Downloading Image /
Downloading Image /
Downloading Image /
Downloading Image /
Downloading Image /
12 Pincurling: Flat & Stand-Up

✔️Place curl inside shaping & pin w/clippie prongs directed to curl’s open end. Pin curlsmust fit w/in curve (or C) of shaping not on top of shaping.
✔️Complete the row. When finished, all the clippies should be parallel to each other.
✔️Continue with the next row. Start at the open end &reverse the shaping.
✔️To finish the style, dry the hair, take out the clippies, & brush the hair.
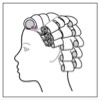
Volume/Stand-Up Pin Curls
Volume pin curls, or stand-up pin curls, produce strong
height &volume in a finished style. often used in crown, where most clients prefer volume or lift.
This type of setting is similar to roller setting; in effect, you are setting the hair on “invisible rollers.”
When creating volume pin curls, keep the following in mind:
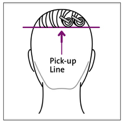
▪️The base shape can be square, rectangular or (especially@ hairline) triangular. Triangular bases at the hairline camouflage separations or splits in comb-out. They look like this:
▪️Depending on the desired results, the curls may be formed at 135°, 90°, 45°, or 0°, as with any volume curl.
▪️Create curls with an open center; the size of the center depends on the desired result. Clip each curl at the scalpwith a clippie on the scalp, with the direction of the curl standing up and away from the scalp.
▪️This technique is most appropriate for straight hair or hair with moderate curl. Tight curls or hair with a high degree of texture should be set on rollers for a smooth result.
▪️The advantage of volume pin curls over roller curls is decreased drying time.
▪️Flat pin curls are often used on the sides of the head in combination with volume curls.
Downloading Image /
Downloading Image /
Downloading Image /
Downloading Image /
Downloading Image /
Downloading Image /
Downloading Image /
Downloading Image /
Downloading Image /
Downloading Image /
Downloading Image /
Downloading Image /
Downloading Image /
Downloading Image /
Downloading Image /
Downloading Image /
Downloading Image /
Downloading Image /
Downloading Image /
Downloading Image /
Downloading Image /
Downloading Image /
Downloading Image /
Downloading Image /
Downloading Image /
Downloading Image /
Downloading Image /
Downloading Image /
Downloading Image /
Downloading Image /
Downloading Image /
Downloading Image /
Downloading Image /
Downloading Image /

FlowVella, Previously Known As Flowboard
© 2026 FlowVella
