Sign up for FlowVella
Sign up with FacebookAlready have an account? Sign in now
By registering you are agreeing to our
Terms of Service
Loading Flow

Downloading Image /
Downloading Image /
Downloading Image /
Downloading Image /
Downloading Image /
Downloading Image /
Downloading Image /
Downloading Image /
Downloading Image /
Downloading Image /
Downloading Image /
Downloading Image /
Downloading Image /
Downloading Image /
Downloading Image /
Downloading Image /
Downloading Image /
Downloading Image /
Downloading Image /
Downloading Image /
Downloading Image /
Downloading Image /
Downloading Image /
Downloading Image /
Downloading Image /
Downloading Image /
Downloading Image /
Downloading Image /
Downloading Image /
Downloading Image /
Downloading Image /
Downloading Image /
Downloading Image /
Downloading Image /
Downloading Image /
Downloading Image /
Downloading Image /
Downloading Image /
Downloading Image /
Downloading Image /
Downloading Image /
Graduated Cutting Technique
4. Cut Sections 3 and 4
This is where you begin graduating the hair. Remember that you are performing a natural graduation, where the elevation is determined by the curve of the head.
1. Position the client’s head upright.
2. Drop basic section 3 and make a subsection that is
approximately 1” thick:
• The size of the subsection depends on the density
(higher density requires smaller subsections).
• Make the subsection parallel to the perimeter.
• Clip aside the rest of the section to control it.
3. Repeat for section 4, making sure that the subsections on each side are the same size.
‼️Note: Use light tension when combing a subsection that contains a strong growth pattern.
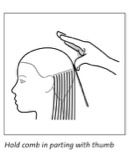
4. Determine the correct elevation:
• Place an end of the comb in the parting of the
subsection you’re about to cut. Hold it in place with
your thumb.
The degree that the comb lifts away from the head
is the correct elevation for cutting (also called “comb
elevation”). When you cut sections 1 and 2, the comb
elevation was 0°, which is why you cut it one length.
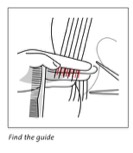
• Pick up a portion of the subsection at the center of
the back. Include a small portion of the guide from
underneath.
• Bring the hair up to the comb elevation.
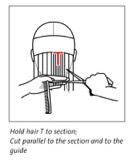
• Hold the hair T to the subsection parting.
• While holding the hair at the comb elevation, recheck
the elevation by placing the comb at the parting again, and then slide out the comb while maintaining the elevation.
5. Find the guideline.
6. Using primary scissors position, cut hair to the guideline.
7. Working from the center to the right and then from the
center to the left, repeat finding the correct elevation andcutting to the guideline for the remainder of sections 3 and 4. When you get to the ear area, there will be no guideline underneath. Continue the back perimeter line through to the front hairline. Hold the hair with light tension in the wide teeth of the comb. The elevation right over the ears is 0°.
‼️Note: As you work on subsections further up the head, be careful to take only a small amount of hair from underneath to use as your guide. If you take too much hair, you could become confused about which previously cut hair is your guide.
8. Check for balance.
5. Cut Sections 5 and 6
1. Drop sections 5 and 6.
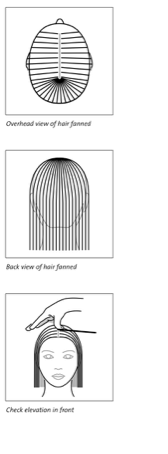
2. Using the wide teeth of the comb, distribute the hair evenly (fanned out) over the crown.
3. With the client’s head upright, continue using the comb
elevation to graduate the hair. Keep in mind:
• Elevation is not the same everywhere. For example,
at the sides of the head, elevation can be almost 0°,
while at the top of the head, the elevation is high.
• Use smaller subsections (approximately Vý) in
sections 5 and 6 to transition from the side to the topof the head.
• Hold hair T to the section.
• Use primary scissors position.
• As always, use a light tension when cutting hair that
has a strong growth pattern.
• Hold your scissors parallel to the subsection part.
19.A
Downloading Image /
Downloading Image /
Downloading Image /
Downloading Image /
Downloading Image /
Downloading Image /
Downloading Image /
Downloading Image /
Downloading Image /
Downloading Image /
Downloading Image /
Downloading Image /
Downloading Image /
Downloading Image /
Downloading Image /
Downloading Image /

FlowVella, Previously Known As Flowboard
© 2026 FlowVella
