Sign up for FlowVella
Sign up with FacebookAlready have an account? Sign in now
By registering you are agreeing to our
Terms of Service
Loading Flow

Downloading Image /
Downloading Image /
Downloading Image /
Downloading Image /
Downloading Image /
Downloading Image /
Downloading Image /
Downloading Image /
Downloading Image /
Downloading Image /
Downloading Image /
Downloading Image /
Downloading Image /
Downloading Image /
Downloading Image /
Downloading Image /
Downloading Image /
Downloading Image /
Downloading Image /
Downloading Image /
Downloading Image /
Downloading Image /
Downloading Image /
Downloading Image /
Downloading Image /
Downloading Image /
Downloading Image /
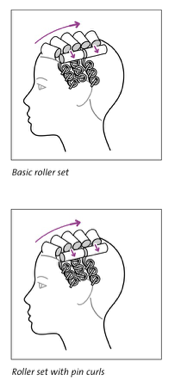
Standard Roller Placement
Rollers are used where strong volume is desired. When
rolling hair, position yourself so you are always rolling the
hair towards you.
1. Begin with wet hair and apply a styling aid.
2. Section off a rectangular base whose length is W” less
than the length of the roller you’re using.
3. Take a subsection from the base that is the same size as
the diameter of the roller.
4. Holding the hair at 90°, wrap the hair on the roller from
the ends to the scalp. When applied, the roller will rest
half on and half off the base.
‼️Note: When applying rollers to the bangs or fringe, you might use lower elevation.
5. Apply a clippie on the bottom of the roller to hold the
hair in place and secure the roller. Secure the bottom
of the clippie near the scalp. The top of the clippie slips
inside the roller.
6. Continue placing rollers in a pattern determined by the
style desired.
‼️Note: In roller setting, separations are more visible
because a straight roller doesn’t conform to the head.
Setting rollers with a diagonal movement, or at a lowerelevation, tends to lessen these separations.
7. Dry the hair, remove the rollers and clippies, and brush
through, following the brush with the palm of your
subordinate hand to control the hair. Shape the hair
according to the setting pattern, and spray to finish.
Note: If the hair is not totally dry on the rollers, the set will relax too much. A set that is completely dry should last until the next shampoo.
Roller curls can be set in combination with pin curls, using
the pin curls in areas where less volume is desired.
Hot Rollers
Hot rollers are applied much the same as standard rollers,
except for the following:
• Begin with hair that is totally dry.
• Apply a spray styling product for hold and control.
• Fasteners are horseshoe shaped prongs that fasten
around the rollers, from the back to the front with the
flat end towards the scalp.
• Check to make sure the rollers are properly heated before applying them, and cool before removing them.
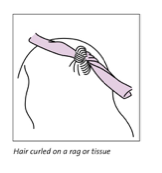
Ragsetting Process
Ragsetting is a different technique than applying standard
or hot rollers.
Before you begin, prepare the wrapping material (10” x 1”
strips of paper towels, tissue, or fabric). If you reuse fabric
strips, they must be washed in hot water and kept sanitized. 1. Begin with damp hair, or dampen dry hair with a
soft-hold styling aid.
2. Start at the nape for long hair or at the hairline for
short hair. Create a section with a base that is about X”,
smaller for tighter curls, or larger for looser curls.
3. Place the fabric on the ends of the hair and roll the hair
around the fabric to the scalp.
‼️Hint: For smoother ends, enclose them in a paper end
wrap.
4. Tie the ends of the fabric over the curl to fasten the curl
in place.
5. Place the curls directionally, the way the finished style
will be worn. If you turn and twist the hair as you roll it,
you’ll get more variation and texture.
6. Dry the hair under a hood dryer. When dry, arrange with
your fingers or lightly brush through the style.
Rollersetting continued...
13.b
Downloading Image /
Downloading Image /
Downloading Image /
Downloading Image /
Downloading Image /
Downloading Image /
Downloading Image /
Downloading Image /
Downloading Image /
Downloading Image /
Downloading Image /
Downloading Image /
Downloading Image /
Downloading Image /
Downloading Image /
Downloading Image /
Downloading Image /
Downloading Image /
Downloading Image /
Downloading Image /
Downloading Image /
Downloading Image /
Downloading Image /
Downloading Image /
Downloading Image /
Downloading Image /
Downloading Image /
Downloading Image /
Downloading Image /
Downloading Image /

FlowVella, Previously Known As Flowboard
© 2026 FlowVella
