Sign up for FlowVella
Sign up with FacebookAlready have an account? Sign in now
By registering you are agreeing to our
Terms of Service
Loading Flow

Downloading Image /
Downloading Image /
Downloading Image /
Downloading Image /
Downloading Image /
Downloading Image /
Downloading Image /
Downloading Image /
Downloading Image /
Downloading Image /
Downloading Image /
Downloading Image /
Downloading Image /
Downloading Image /
Downloading Image /
Downloading Image /
Downloading Image /
Downloading Image /
Downloading Image /
Downloading Image /
Downloading Image /
Downloading Image /
Downloading Image /
Downloading Image /
Downloading Image /
Downloading Image /
Downloading Image /
Downloading Image /
Downloading Image /
Downloading Image /
Downloading Image /
Downloading Image /
Downloading Image /
Downloading Image /
Downloading Image /
Downloading Image /
Downloading Image /
Downloading Image /
Downloading Image /
Downloading Image /
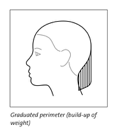
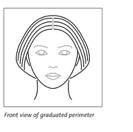
Graduated Cutting Technique
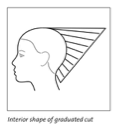
A graduated cut means that the interior shows a
progression of lengths, creating a beveled appearance.
Graduated Cutting Procedure
📺🎬👀See DVD: Scene 2.1, Graduated
1. Section Hair
The sectioning for a graduated technique cut starts with thesix basic sections. (See Lesson 3: Sectioning in this module.)
If the client always wears a side part, angle that part
from the front hairline to the center crown. This side part
connects with the back center part. However, if the client
wants to be able to change the part or wear a center part,
part the hair in the center for cutting.
2. Check Client’s Body Position
Raise the client’s chair to where the perimeter will be at
your chest level.
Hint: Make sure that the client’s legs are not crossed.
Crossed legs tilt the client’s body, making it harder to
cut hair evenly.

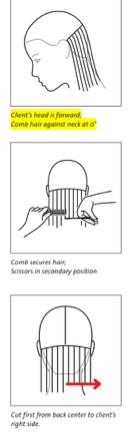
3. Cut/Establish the Guideline
(Cut Sections 1 & 2 One-Length)
Cut sections 1 and 2 as you did for the one-length technique. The natural elevation in this area is 0°.
‼️👉Remember:
• The client’s head is forward to create a solid plane (the neck) on which to cut.
• Comb with the fine teeth of the comb to create maximum tension to get a clearly defined line.
• Comb the hair into gravity (don’t shift hair to the side) and at 0° (without elevation).
• If the hair is dense, subsection it.
• Use the spine of the comb to secure the hair against the nape of the neck.
• Use secondary scissors position (thumb and fingers down) to cut.
• Hold both the comb and the scissors parallel to the section parting.
• Always cut from the back center to the client’s right side. Then return to the center and cut from the center to the
client’s left side.
• Check the balance in the mirror and make corrections before continuing.
19
Downloading Image /
Downloading Image /
Downloading Image /
Downloading Image /
Downloading Image /
Downloading Image /
Downloading Image /
Downloading Image /
Downloading Image /
Downloading Image /
Downloading Image /
Downloading Image /
Downloading Image /
Downloading Image /
Downloading Image /
Downloading Image /
Downloading Image /

FlowVella, Previously Known As Flowboard
© 2026 FlowVella
