Sign up for FlowVella
Sign up with FacebookAlready have an account? Sign in now
By registering you are agreeing to our
Terms of Service
Loading Flow

Downloading Image /
Downloading Image /
Downloading Image /
Downloading Image /
Downloading Image /
Downloading Image /
Downloading Image /
Downloading Image /
Downloading Image /
Downloading Image /
Downloading Image /
Downloading Image /
Downloading Image /
Downloading Image /
Downloading Image /
Downloading Image /
Downloading Image /
Downloading Image /
Downloading Image /
Downloading Image /
Downloading Image /
Downloading Image /
Downloading Image /
Downloading Image /
Downloading Image /
Downloading Image /
Downloading Image /
Downloading Image /
Downloading Image /
Downloading Image /
There are three kinds of curls
• Croquignole curls
performed end to scalp (UNDER 5")
• Figure 6 curls, which are commonly created in short to
mid-length hair (5-13")
• Figure 8 curls (13" or longer)
Croquignole Curls (for hair under 5” in length)
After forming the base, use this curling technique only on the shortest hair (5” or less in length).
This curl is performed end to scalp.
1. Do the following all in one motion, immediately after rocking in the base:
• Holding the curl at the correct elevation, pull out to the hair end. Do this by curving the iron with the tongand barrel close together.
• With the comb held at the scalp, roll down to
complete the curl.
2. Remove the curl from the iron by gently clicking the iron to the right and moving the hair with the comb.
3. Optional: Clip the curl in place for a firmer set.
4. When the hair cools, remove the clips (if you used them) and brush the hair through to finish, applying hair spray or other product as necessary.
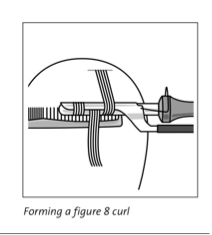
Figure 8 Curls (for long hair)
After forming the base, use this curling technique for hair that is 13" or longer.
1. Do the following all in one motion, immediately after rocking in the base:
• Holding the hair at the correct elevation, move the iron away from the scalp to about mid-shaft.
• Use the comb to move the hair along the barrel
toward your hand, near the handle, and then rotate
the iron.
‼️Note: At this point, the creation of a figure 8 curl is verysimilar to the creation of a figure 6 curl.
• Then draw the strand to the opposite side of the curl
and pull it over the top of the barrel (use your fingers or comb if necessary).
• Place the comb under the curl, by the scalp, to protect the scalp.
2. Rotate the hair around the tong and barrel, clicking so the hair rotates freely into a curl.
3. Continue rotating until all the hair in the strand is curled around the barrel.
4. Remove the curl from the iron by gently clicking the iron
and moving the hair with the comb off the barrel.
5. Optional: Clip the curl in place for a firmer curl.
6. When the hair cools, remove the clips (if you used them) and brush the hair through to finish, applying hair spray or other product as necessary.
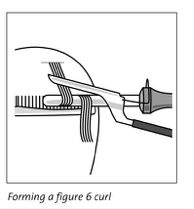
Figure 6 Curls (for short to mid-length hair)
After forming the base, use this curling technique for hair that is 5–13” long.
1. Do the following all in one motion, immediately after
rocking in the base:
• Holding the curl at the correct elevation, move the
iron away from the scalp.
• Use the comb to move the hair along the barrel
toward the handle, and then rotate the iron.
• Place the comb under the curl, by the scalp, to protect the scalp.
2. Rotate the iron, opening and closing it so the hair rotatesfreely into a curl.
3. Continue rotating until the full length of the strand is
curled around the barrel.
4. Remove the curl by gently clicking the iron to the right and moving the hair with the comb off of the barrel.
5. Optional: Clip the curl in place for a firmer set.
6. When the hair cools, remove the clips (if you used them) and brush the hair through to finish, applying hair sprayor other product as necessary.
14.c
Thermal Iron Curling
Technique
Downloading Image /
Downloading Image /
Downloading Image /
Downloading Image /
Downloading Image /
Downloading Image /
Downloading Image /
Downloading Image /
Downloading Image /
Downloading Image /
Downloading Image /
Downloading Image /
Downloading Image /
Downloading Image /
Downloading Image /
Downloading Image /
Downloading Image /
Downloading Image /
Downloading Image /
Downloading Image /
Downloading Image /
Downloading Image /
Downloading Image /
Downloading Image /
Downloading Image /
Downloading Image /
Downloading Image /

FlowVella, Previously Known As Flowboard
© 2026 FlowVella
