Sign up for FlowVella
Sign up with FacebookAlready have an account? Sign in now
By registering you are agreeing to our
Terms of Service
Loading Flow

Downloading Image /
Downloading Image /
Downloading Image /
Downloading Image /
Downloading Image /
Downloading Image /
Downloading Image /
Downloading Image /
Downloading Image /
Downloading Image /
Downloading Image /
Downloading Image /
Downloading Image /
Downloading Image /
Downloading Image /
Downloading Image /
Downloading Image /
Downloading Image /
Downloading Image /
Downloading Image /
Downloading Image /
Downloading Image /
Downloading Image /
Downloading Image /
Downloading Image /
Downloading Image /
Downloading Image /
Downloading Image /
Downloading Image /
Downloading Image /
Downloading Image /
Downloading Image /
Downloading Image /
Downloading Image /
Downloading Image /
Downloading Image /
Downloading Image /
Downloading Image /
Downloading Image /
Downloading Image /
Downloading Image /
Downloading Image /
Downloading Image /
Downloading Image /
Downloading Image /
Downloading Image /
3. Cut the Interior Guide
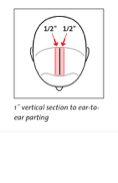
1. Create an ear-to-ear parting to divide the front from the back: Part the hair from the front of the right ear (where the ear attaches to the head) across the top of the head to the front of the left ear.
‼️Note: The ear-to-ear parting can be slightly further backon the head if the hair is fine, but no more forward. This is dependent on hair density and head shape.
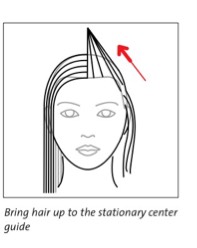
2. At the top of the head, create a 1" vertical subsection from the front hairline to the ear-to-ear parting. Take1/2" from each side of the middle.
3. Stand on the client’s right.
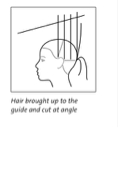
4. Hold the subsection (or as much of it as you can control) at 90°.
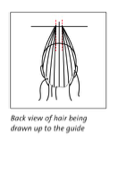
5. Drop all but a little of the safety section. What’s left of it
(the hair closest to the uncut hair) is your guide.
6. Cut the 1" rectangular subsection:
• Elevate the subsection to 90°.
• Cut in a backward flowing angle. Position the fingers holding the hair at an angle that goes from short to long so that the scissors can follow the direction of your fingers.
• Repeat until the entire subsection has been cut.
‼️Note: Instead of cutting the hair in a backward flowing
angle, you can choose to cut it forward (shorter in
back than front) or horizontal (flat on top). Discuss the
options with your client and determine the best look.
4. Layer the Front
When you layer the front, you are layering the hair in front
of the ear-to-ear parting.
1. Make sure that the ear-to-ear part remains clean. If necessary, clip the back to isolate it from the front.
2. Now stand on the client’s left. You will be layering the
hair on the right, and keeping the guide closest to you.
3. Pick up the rectangular section that you just cut, and holdit at 90° from the center top.
4. Use the comb to bring up a 1" subsection without changing the elevation of the original guide. The subsection is:
• Parallel to the guide.
• On the side away from you (the client’s right).
5. Cut the subsection to the length of the guide, following the angle of the guide.
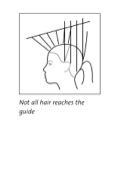
6. Continue bringing up subsections in front of the ear-to-ear parting to the guide until no more hair on the right side reaches the guide. Make sure that the guide is always at 90° to the center of the head.mThe hair not reaching the guide falls away and remains perimeter weight.
7. Stand on the client’s right and repeat for the left side.
Long Layer Technique
21.A
Downloading Image /
Downloading Image /
Downloading Image /
Downloading Image /
Downloading Image /
Downloading Image /
Downloading Image /
Downloading Image /
Downloading Image /
Downloading Image /
Downloading Image /

FlowVella, Previously Known As Flowboard
© 2026 FlowVella
