Sign up for FlowVella
Sign up with FacebookAlready have an account? Sign in now
By registering you are agreeing to our
Terms of Service
Loading Flow

Downloading Image /
Downloading Image /
Downloading Image /
Downloading Image /
Downloading Image /
Downloading Image /
Downloading Image /
Downloading Image /
Downloading Image /
Downloading Image /
Downloading Image /
Downloading Image /
Downloading Image /
Downloading Image /
Downloading Image /
Downloading Image /
Downloading Image /
Downloading Image /
Downloading Image /
Downloading Image /
Downloading Image /
Downloading Image /
Downloading Image /
Pincurling: flat/ stand-up
Introduction
The amount of mobility created by different stem lengths inflat pin curls varies as follows:
• No-stem curls rest entirely above the pick-up line and
create curls with minimum mobility.
• Half-stem curls, which rest half on and half off the pick-
up line, create more mobility than no-stem curls.
• Full-stem curls (also known as long-stem curls) rest
entirely below the pick-up line and create maximum
mobility.
Movement is created by the placement of the pin curl. For
example, to create a style that flows to the right, create a
shaping and place the curls in that direction.

Basic Pin Curl Set Procedure
1. Prepare the Hair
1. Start with hair that is damp or wet.
2. Apply styling aid for control and distribute it evenly fromthe scalp to the ends.
2. Create Horizontal Shapings
A shaping is a section of hair that has been formed into a
C contour. Alternating C shapings form an S pattern. Followthese steps to form a shaping:
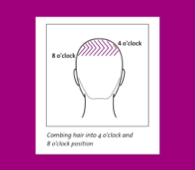
1. Stand straight on to the section you are curling.
2. Form a clockwise shaping by combing the hair to the
4 o’clock position.
3. Holding the hair in place with your first two fingers,
comb the same hair to the 8 o'clock position.
4. Continue the 4 o'clock and 8 o'clock movement until the shaping is formed for the entire row.
Continued
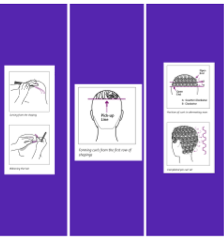
3. Form No-Stem On-Base Flat Curls
Begin a row of pin curls at the open side of the C (the
shaping’s open end).
❗️Hint: Use a plastic tail comb to pick up the hair.
1. Beginning at the open end of the shaping, carve about a Xsection from the shaping. Slide the tail of the comb to the ends of the hair, while holding the shaping at the base.
2. Protecting the shaping with the index finger of your
other hand, palm the comb.
3. Pick up the ends of the strand with the thumb and first two fingers of your dominant hand and use them to ribbon (stretch) the hair, without disturbing the shapingat the scalp. The pin curl section is approximately 3/4"
4. Mold the hair into a curl, with the hair ends inside the curl, and holding the hair close to the head. Do not lift or elevate the strand; keep it flat while performing the curl.
‼️Note: If the hair is elevated, loose hairs will appear at the curl’s bottom and splits will be created in the set.
5. Place the curl inside the shaping and pin it with the
clippie prongs directed to the curl’s open end. Pin curls
must fit within the curve (or C) of the shaping, not on
top of the shaping.
6. Complete the row. When finished, all the clippies should be parallel to each other.
7. Continue with the next row. Start at the open end and reverse the shaping.
8. To finish the style, dry the hair, take out the clippies, andthoroughly brush the hair.
12
Downloading Image /
Downloading Image /
Downloading Image /
Downloading Image /
Downloading Image /
Downloading Image /
Downloading Image /
Downloading Image /
Downloading Image /
Downloading Image /
Downloading Image /
Downloading Image /
Downloading Image /
Downloading Image /
Downloading Image /
Downloading Image /
Downloading Image /
Downloading Image /
Downloading Image /
Downloading Image /
Downloading Image /
Downloading Image /
Downloading Image /
Downloading Image /
Downloading Image /
Downloading Image /
Downloading Image /
Downloading Image /
Downloading Image /
Downloading Image /
Downloading Image /
Downloading Image /
Downloading Image /
Downloading Image /

FlowVella, Previously Known As Flowboard
© 2026 FlowVella
