Sign up for FlowVella
Sign up with FacebookAlready have an account? Sign in now
By registering you are agreeing to our
Terms of Service
Loading Flow

Downloading Image /
Downloading Image /
Downloading Image /
Downloading Image /
Downloading Image /
Downloading Image /
Downloading Image /
Downloading Image /
Downloading Image /
Downloading Image /
Downloading Image /
Downloading Image /
Downloading Image /
Downloading Image /
Downloading Image /
Downloading Image /
Downloading Image /
Downloading Image /
Downloading Image /
Downloading Image /
Downloading Image /
Downloading Image /
2. Form Additional Waves
1. To place the second wave, move to the opposite side of
the part, the "light side." Begin the second ridge just
below the part by moving the hair towards the face,
creating the open end (#2 in the illustration on the
previous page). Then follow steps 3–9 above to form the wave.
2. Continue the same ridge all the way around the head,
until the ridge is complete. When the second wave is
complete, the closed end is formed.
3. To form the third wave, start on the side where
you completed the previous wave, placing your finger
approximately W” below that wave.
4. Repeat the procedure listed above, going in the oppositedirection.
3. Finish the Style
1. Dry the hair using a hood drier.
2. Brush through to finish for a classic look, or apply a spray-on dressing for gloss and shine if waves are not to be combed out.
Variations
Common variations on the horizontal finger waving
technique described earlier include the following:
• Pompadour
(can be horizontal, vertical, or diagonal)
• Vertical finger waving
• Diagonal/oblique finger waving
You can use a combination of finger waving method that will fit the client needs.
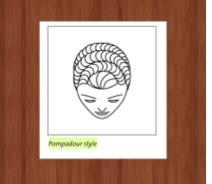
PPompadour
A pompadour is a style that is not parted and is worn off theface. The set shown here has waves that become horizontal from a circular pattern in the crown.
To create this style, follow the procedure listed earlier,
starting at the front hairline and working back. Remember
to always start at the open end.
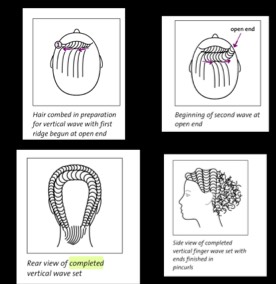
Vertical Finger Waving
Finger waving patterns can be created vertically as well as
horizontally. The set described here has no part and has
waves that flow vertically across the front and sides of the head, forming a pompadour. These waves will meet in backor may be set in a combination pattern.
To create this set, use the same procedure as for horizontal finger waving, except for the following:
• Stand behind the client.
• Comb hair straight back, off the client’s face.
• Begin on the left side, directing the wave to the left.
• Reverse the direction to form the next wave.
• The back of the finished set should fall into a horseshoe pattern.
Diagonal/Oblique Finger Waving
Diagonal (also known as oblique) finger waves are often
combined with horizontal and vertical patterns. You can
start with one pattern and shift to another as you work
down the head.
For example, you can place your fingers and perform the
same procedure diagonally, and then gradually work into a horizontal or vertical pattern.👇

11.A
Downloading Image /
Downloading Image /
Downloading Image /
Downloading Image /
Downloading Image /
Downloading Image /
Downloading Image /
Downloading Image /
Downloading Image /
Downloading Image /
Downloading Image /
Downloading Image /
Downloading Image /
Downloading Image /
Downloading Image /
Downloading Image /
Downloading Image /
Downloading Image /
Downloading Image /
Downloading Image /
Downloading Image /
Downloading Image /
Downloading Image /
Downloading Image /
Downloading Image /
Downloading Image /
Downloading Image /
Downloading Image /
Downloading Image /
Downloading Image /
Downloading Image /
Downloading Image /
Downloading Image /
Downloading Image /
Downloading Image /

FlowVella, Previously Known As Flowboard
© 2026 FlowVella
