Sign up for FlowVella
Sign up with FacebookAlready have an account? Sign in now
By registering you are agreeing to our
Terms of Service
Loading Flow

Downloading Image /
Downloading Image /
Downloading Image /
Downloading Image /
Downloading Image /
Downloading Image /
Downloading Image /
Downloading Image /
Downloading Image /
Downloading Image /
Downloading Image /
Downloading Image /
Downloading Image /
Downloading Image /
Downloading Image /
Downloading Image /
Downloading Image /
Downloading Image /
Downloading Image /
Downloading Image /

Round Brush Styling (continued)
3. Form the Curl
❗️❗️Note: If you don't want any volume, you can use lower
or no elevation at the base and just form curl at the
ends.
1. After the base is dried, slide the brush with some
curvature toward the mid-shaft and dry the mid-shaft.
2. Slide the brush through the hair ends and dry the ends.
3. Curl the hair around the brush all the way from the ends
to the scalp, while continuously drying and rotating the
brush. Check to make sure that all the ends are curled
smoothly into the brush, taking care to avoid fish-hookedends. Unroll the hair and roll it again until the hair is
dried evenly. The next step depends on whether you are doing a hard set or a soft set.
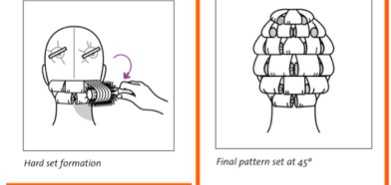
Forming the Hard Set
1. Release the brush from the hair.
2. Quickly re-form the curl using your hands.
3. Clip the curl as you would a volume pin curl.
4. Optional: Apply hair spray if you want a firmer set.
5. Continue with the rest of the hair, forming the curls in an alternating bricklaying pattern as shown in the
illustration.
6. Once the hair has cooled and is dry, release the curls andbrush through to finish.
Forming the Soft Set
1. With the hair rolled in the brush at the correct elevation,
hold the blow dryer away from the hair for a few secondsto allow the hair to cool.
❗️Hint: Some blow dryers have a “cool” setting, which you can use to help the hair cool down. This enhances the
firmness of the curl.
2. Release the curl.
3. Repeat the procedure of drying in the base and forming
the curl for the remainder of the hair.
4. To finish the set, brush through the hair.
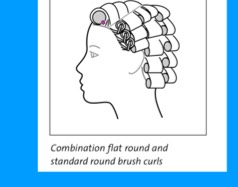
Variation: Flat Round Brush Curls
Use flat round brush curls for areas of hair that you want
to be very close to the head. These curls are very similar toindentation pin curls and can produce a similar look.
To create a flat round brush curl:
1. Dry in the base as described earlier, using a very
low elevation and directing the brush opposite to the
comb-out direction to create an indentation curl.
2. Pin the curl flat while it is warm and dry with a double-pronged clippie.
3. Repeat until the flat area is curled.
💫💫Because of its versatility, this is one of the most frequently performed salon finishing techniques. Select a soft or hard set depending on how strong a curl you want. Determine the elevation to use at each part of the head based on howmuch volume you want.
10.A
Downloading Image /
Downloading Image /
Downloading Image /
Downloading Image /
Downloading Image /
Downloading Image /
Downloading Image /
Downloading Image /
Downloading Image /
Downloading Image /
Downloading Image /
Downloading Image /
Downloading Image /
Downloading Image /
Downloading Image /
Downloading Image /
Downloading Image /
Downloading Image /
Downloading Image /
Downloading Image /
Downloading Image /
Downloading Image /
Downloading Image /
Downloading Image /
Downloading Image /
Downloading Image /
Downloading Image /
Downloading Image /
Downloading Image /
Downloading Image /
Downloading Image /
Downloading Image /
Downloading Image /
Downloading Image /
Downloading Image /
Downloading Image /
Downloading Image /

FlowVella, Previously Known As Flowboard
© 2026 FlowVella
