Sign up for FlowVella
Sign up with FacebookAlready have an account? Sign in now
By registering you are agreeing to our
Terms of Service
Loading Flow

Downloading Image /
Downloading Image /
Downloading Image /
Downloading Image /
Downloading Image /
Downloading Image /
Downloading Image /
Downloading Image /
Downloading Image /
Downloading Image /
Downloading Image /
Downloading Image /


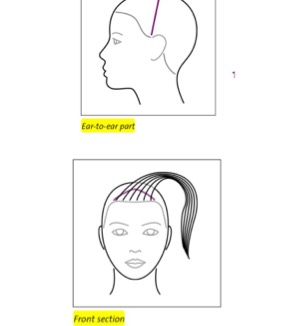
1) Prepare and Section the Hair
1. If the hair has body, start with dry hair, and apply hair spray for manageability and to control static electricity.
**If the hair is curly or wavy, smooth it by setting on electricrollers or wet it and then blow it dry with a paddle brush.
**If the hair is limp and straight, apply a spray styling product and set the hair in 4–6 large volume curls. Then dry. This quick set will add body and slight movement to the hair, making it more manageable for styling.
2. Create an ear-to-ear part in front of the ears to divide the front of the style from the back, or section a triangle at the front hairline.

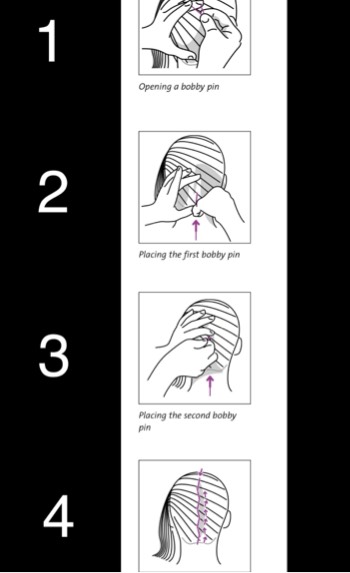
3. Place the Pins
1. Hold the hair in position with the palm of your
subordinate hand, with your thumb placed at the center,
bottom of the nape.
2. Open a bobby pin: Holding it at the bottom, use a finger
at the tip to pry it open.
Note: Do not use your teeth to open bobby pins.
3. Place the flat side of the bobby pin in the hair against the scalp at the nape. Slide the bobby pin in vertically and
then hold it securely with the thumb of your subordinate hand on the bottom and the index finger of the same
hand on the top of the bobby pin.
4. Place the next bobby pin so its bottom crosses the tip
of the previous bobby pin, and the two pins are slightly
criss-crossed but nearly vertical. Hold them in place as
you did the previous bobby pin.
5. Continue placing bobby pins upwards to the crown in
this interlocking pattern. At the crown, place one bobby
pin in the reverse (downward-facing) direction to lock therow of bobby pins in place.
6. If the hair at the nape is loose, put a bobby pin over the
first one at the nape as a reinforcement.
Variation
Without interlocking the bobby pins, place a staggered row
of pins up the back of the head. Start in the nape and work
up to the crown.
O
2) Brush and Cushion
1. Brush the hair. If needed for support, back-comb portions of the hair with a styling comb. Back-combing creates volume, and can be used as a tool for support or as a cushion in which to anchor the pins. Common areas for back-combing are the crown and down the middle of the back where the pins will be placed.
2. Tip the head forward and use the brush to smooth the hair inward and slightly upward from the nape, working up the back of the head and holding it with yoursubordinate hand. Once the bulk of the hair is up, apply hair spray for support and manageability. Apply the hair spray approximately 10" from the scalp. (If you spray it closer to the head, the hair will be too wet.)
Updo's ( French Twist ) part. 1
8
Downloading Image /
Downloading Image /
Downloading Image /
Downloading Image /
Downloading Image /
Downloading Image /
Downloading Image /
Downloading Image /
Downloading Image /
Downloading Image /
Downloading Image /
Downloading Image /
Downloading Image /
Downloading Image /
Downloading Image /
Downloading Image /
Downloading Image /
Downloading Image /
Downloading Image /
Downloading Image /
Downloading Image /
Downloading Image /
Downloading Image /
Downloading Image /
Downloading Image /
Downloading Image /
Downloading Image /
Downloading Image /
Downloading Image /
Downloading Image /
Downloading Image /
Downloading Image /
Downloading Image /
Downloading Image /
Downloading Image /
Downloading Image /
Downloading Image /
Downloading Image /
Downloading Image /
Downloading Image /
Downloading Image /
Downloading Image /
Downloading Image /
Downloading Image /
Downloading Image /

FlowVella, Previously Known As Flowboard
© 2026 FlowVella
